Hello again! Found my way back here.

   It’s winter again. Today is Tuesday, and we have received over one foot of snow so far, at 14:00 hrs. Not a record-breaking amount, but a lot for us, since we had a completely green Christmas. I was actually gardening on Christmas day, in a t-shirt!!!

Last week ended with a deep freeze, so deep we lost the mercury on our thermometer. The coldest this thermometer drops to is -30 C. It has crept back up a little, only to land us in a very real snow storm. Not a  raging, windy, howling and blustering storm. Only a constant, heavy fall of rather fine flakes, collecting on our window sills and everywhere else, high enough to prevent seeing out, is what we woke up to today. I dug out the seeds and other treats we put out for the birds and squirrels, but it got re-buried within 30 minutes. The crows are cawing and chatting… We are privileged to host 5 crows almost every day,  at our feeding station!!!

But I am not here to talk about the birds or animals or the weather! I got rather busy last year with many projects. Some from the local Super Heroes group, others from the 501st, weddings and proms and finally quite a few personal things, such as my first ever, absolutely (looking) accurate Tudor gown and other costumes needed for our first visit to a Renaissance Fair in the U.S.A. My own Tudor outfit took very close to 300 hours. There was a lot of hand embroidery, as well as free-motion machine hand-controlled embroidery, beading and hand-couching and a lot of hand sewing to get it all together.

It looks like I am slipping into talking about that project, rather than talking about my K-Coats (which are what I intended to discuss!!!!!!). I also started making K-Coats last year.  In fact I produced 34 of them!!! Some were commissioned, most were just coats I HAD to make!!! That was what I thought to write about today. So which shall it be?

I think that now that I have started, I will continue with the Tudor outfit. I am very proud of it. Since it takes a lot of room in the closet, Justin suggested we keep My Lady on her mannequin, in the living room, near the fireplace. A permanent exhibit of what I consider to be the apotheosis of my *making* career. I wore it only 4 hours. Maybe even not quite.

tudorblogg (1)

Our Tudor couple.

The whole RenFair experience was new to us. We were invited to join my friend and her husband at the Bristol, WI. Renaissance Fair. Then I invited another friend to come and she brought one daughter and a niece too!!! The Bristol Faire is considered to be the *best* RenFair in the country. Their time-frame is late Elizabethan. I chose late Tudor as our era for our costumes.

Our first look at the Entrance to Bristol Renaissance Faire!!

Our first look at the Entrance to Bristol Renaissance Faire!!

I could go into the whole story of how and why Tudor times have always been my favourite era in history. I think I may have touched upon that in a past entry of my blogging. If I haven’t, I will come back to that, later here, or in another blog.

There is so much goes into making a costume (or any piece of *meaningful* clothing). Especially for me. THIS Tudor costume has been decades in the desiring, thinking, preparing, envisioning, designing etc. and also collecting of fabrics and trims, embroideries, beads, gems and buttons. My use of burgundy for it is not surprising at all. In fact, burgundy has been a favourite of mine all my life, probably because of my love for Tudor costuming. I used silk for the outer, final layer of the garb. I made a pair of stays two years ago… in hope that one day they would be used within their proper context. I made the stays to go to the 5th Anniversary of the Ottawa Steampunk group’s gala. I was thinking ahead. There was a chance that I would be going to a RenFair in the next couple of years, so my corset for the Steampunk Gala was actually a Pair of Stays.

My reversible pair of stays.

My reversible pair of stays. Note the blackwork embroidery at neckline and sleeve hems. All the ridges seen here smooth out very flat once I am wearing it.

I made the stays, with all their boning, and the outside layers in two silks: a red one, with black sketches of roses, for the inside and a pale blue heavier brocaded silk (bought in Shanghai!! The Mecca of silks!!!) for the outer layer. In fact, the stays were made to be reversible. So I could wear them red, or blue. I cheated in the end. I have made many corsets and gowns requiring lacing up at the back. I have worn many myself. This time, I decided, I would use a zipper (OOOOARGH!!! OH!!!! SHAME!!!) to make it easier to get on, if I had to do it alone. At the Fair, my friend pointed out that if I had put lacing on them, I could have reduced my silhouette by several inches. Perhaps. Yes, perhaps. But, (when I first made them), I wanted to be relatively comfortable… and Tudor stays, in any case, were not made to reduce the size of the wearer. They were made to force the body’s shape cylindrical. Not curvaceous. No emphasis on the chest size (eyebrows raising in a knowing way). In fact, the stays rather flatten the bust: they push it up, but do not reconfigure it. I didn’t really mind that I could have been 5 inches smaller. I was glad, actually, in the end, that the stays straightened and helped support my back, without forcing me smaller. It was a very hot and humid day (31C) in Bristol when I wore My Lady Tudor. I stayed in the shade most of the day… The first 2 hours were a rather precarious time, when I relied on my cane for stability and I was really fighting fainting from the heat… then I got used to it all, and spent another two hours parading about as if I had been born to that clothing!!!

My Lady Tudor is based on three or four paintings I finally chose to help design this gown.

elizabeth1546

janeseymour  bookcover

I was determined to make it as accurate as can be. Some parts were made to *look* perfect. I didn’t make a separate placard. I made the bodice all in one, with folds in the fabric in strategic places, to make it look like there was a separate placard and I sewed on brass pin heads in the right places. In Tudor times, they preferred to cover the lacing up part, which was at the front, unlike the Victorians’ dresses and corsets, and they covered this lumpiness with a placard. Enhancing and further shaping the body into a cylinder. Not a shapely (eyebrows raising up and down) bosomed bodice. The bosom was pushed up. Some RenFair girls wear their stays WAY too tight (I felt) to REALLY do that push-up thing. I actually asked one or two of them in Bristol if it was painful having your breasts pushed up so high, you could rest your chin on them….. Apparently, it is not uncomfortable.

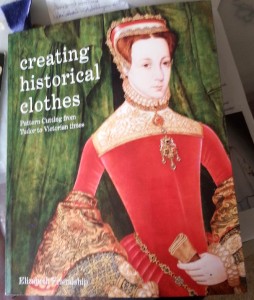
I digress again. Such is my mind. Wandering and remembering and commenting! The three paintings I used as reference guides were: the cover of the book which gave me the instructions and guidelines of all the parts I needed for the costume. This book is: *Creating Historical Clothes*. The painting is of a 16 year-old *woman* in 1565. I also used the painting of Princess Elizabeth, at age 13 or 14 (1546). Then there was a painting of Queen Katherin Parr, the one who out-lived King Henry VIII. But at the time of the painting she was simply a*Lady*, wife of Lord Latimer, but the depiction of her clothing was very instructional. Another painting which had good details and inspiration, was one of Queen Jane Seymour: the one who died of childbirth and is renowned to be Henry VIII’s *favourite* wife. Favourite only because she is the only one who bore him a son who survived early childhood… But that is a whole other story and subject to many thoughts of mine…. Not needed here!

All these dresses were red to burgundy, by the way! I got jewellery details and sewing details from all these paintings.

I looked for more books and more information… I eventually based all the details on these paintings and made what I hoped were correctly looking historical parts. When I strayed from *CORRECT*, it was only so I could get into this clothing on by myself. With very little help if required. That’s why the placard is included in the bodice’s  design. Just one piece, yet it looks like two or more. Really. It does!!! I have had a lot of experience making historical clothing easy to make and put on, yet LOOK exactly right. Does not take away from the final costume!!!

There was the blackwork embroidered linen under-chemise. Then the under-skirt, then the *hoop skirt*, then the kirtle (or kyrtle), in two parts in my case.  Then finally the over skirt  comprised of the fore skirt, which is the flashy showy part of the skirt which is sewn to the rest of the skirt which is always hidden. The bodice was layered this way: chemise (well embroidered, in blackwork, at neck and sleeve hems), stays, kyrtle top, silk bodice top.

detailsleeve

Close up of the over sleeve with the linen chemise peeking through. Note the blackwork.

As big as I thought my bum roll turned out, it seems I still managed to make it smaller than many I have seen since. It feels cool though!! Then the various skirts and hooped parts. Then, FINALLY, the outer skirt. I found some beautiful burgundy silk at a second-hand shop. It was actually a brand new queen-size duvet cover, silk on BOTH sides, bed skirt and two king size pillow shams. All silk, all clean and new!!!!

The fore skirt had a very good pattern on it, but it needed some more pizazz…. So I over embroidered, free-hand machine embroidery, a good part of the gold in it. As it still needed *more*, I also added gold metallic trim which I decorated further with black satin soutache and eventually pearlized beads in various sizes and larger gemstones to it. This fabric also served as the under sleeves, which had slashes cut into them. The picture below shows the embellishments on the fabric for the over sleeves.

beadingsleeve

This is the main fabric for the fore skirt and the under sleeves. It required quite a bit of extra dazzle.

detailwholesleeve

Here you can see the over sleeve, covered by the over fold, which was couched and beaded as well as black work added to give it more texture.

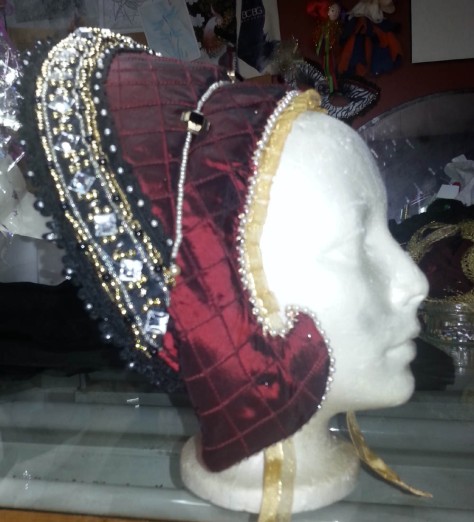
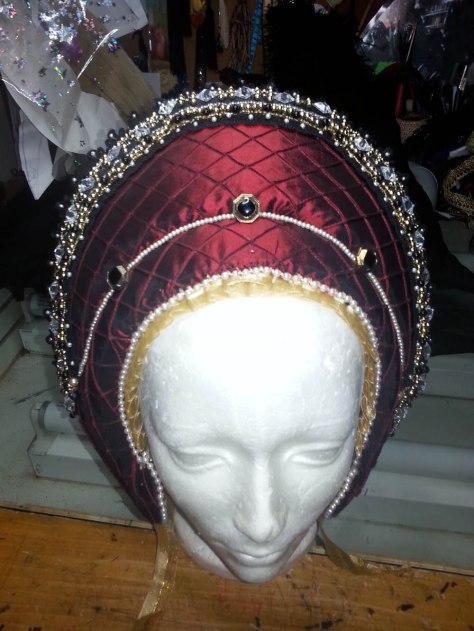
I made the French Hood too. There were many hours of beading in that!!! I was happy with the end result. I used a pattern for it, and although I reduced the size of it when I cut the first piece, after it was all done, the various layers of cotton and felt added some volume to it. I did sew the ties for it, which go under the neck, to help hold it up, but they drove me crazy in my fittings. So I altered it by adding a hair comb on the inside, to attach it to my hair. That was a good idea: it stayed on my head very comfortably that way and didn’t strangle me, the way the ties had done.

hoodside 20150816_164738

I also made my husband’s costume…. He had a few stipulations though: NO *bubble pants*, it must have matching fabric to mine, no silliness. How does one achieve *NO silliness* when reproducing a historic costume? They wore these clothes with absolute faith that these were what is right. The same way we do with all our trends and fancies today, in the 21st Century1!! And his costume adventures will be the subject of my next blog I think!!

Rose Marie: a 1940’s Wedding or Evening Gown.

RoseMarie2 RoseMarie1 RoseMarie1 - Copy

This is another formal gown, named Rose Marie, by The Tailor’s Apprentice. As usual, I received it as a .pdf downloadable pattern (e-pattern or digitized pattern). This one had more pieces and took much longer to re-assemble but it was well worth my while!

HPIM6898Re-assembling the printed sheets and preparing for cutting.

The pattern allows you to make several outfits: a wedding or evening gown, with or without sleeves, long or short or even with flounced sleeves. You can make it short for day wear, or make it into a two-piece suit, again with a selection of sleeves. I chose a fabric I brought back from a holiday in Curacao. It has a vaguely vintage print on it which I thought suitable for this pattern.

I chose to make a two piece, sleeveless outfit as this fabric is very light cotton and would only be worn in our hot months… and I wasn’t sure there would be quite enough, as it was much narrower than usual. It was the right decision in the end as I had to be a little creative with the top and make a *stepped* front hemline. If you look at the picture of the whole outfit (below), you will see that the center panel of the blouse is a little shorter than the side ones. I didn’t bias hem that piece to prevent *cutting* the visual line across an unflattering width…. 😉

Rose Marie has the typical 1940’s sweetheart neckline which I find so feminine and pretty, especially for summer clothing. As I mentioned, I made it sleeveless. The instructions were very helpful and clear, explaining how to sew up the pattern in true ’40s style, with a side zipper or hooks and eyes or snaps. I opted for a zipper and although I used an invisible zipper, I did follow the instructions to make it hidden under a narrow placket. It does look better that way!

HPIM6907 Bias tape binding both front and back sweetheart necklines.

HPIM8064 The placket over the invisible zipper, on the side of the blouse.

HPIM8066 The bound blouse hemline.

As for the skirt, I chose to make an elasticized waistband (more comfortable and easier to pull on: my fingers have trouble these days with buttons, hooks and snaps even zipper pulls!) with an uneven hemline: the front being a few inches shorter than the back. There are instructions and indications on the pattern for making the skirt as well as for making a separate top.

In order to make an elasticized waistband, I cut the fabric straight up from the waistline, for 3 1/2 inches. That’s double the width of the elastic plus a little to turn under to make the casing. That seam line is sewn right on the waistline. I call this a *self-waistband*: it has no seams (less bulk too) and uses less fabric than making a facing which has to be sewn onto the skirt and then turned under to make the casing. I really had to be frugal with the fabric!!!

I made an uneven hem line because I wanted the skirt to be longer but because I realized in placing the pattern pieces on the fabric that there just wouldn’t be enough of it, I opted to make it shorter at the front and keep the length I wanted for the back.

One of the pictures included in the pattern shows a day suit of blouse and skirt. It shows how the skirt was trimmed with red (bias binding?) at the skirt hem and the same red is on the neckline and sleeve cuffs. I really liked that detail. I was able to find a light blue bias tape, pre-folded, that matched my fabric and so, I finished many edges with it: the curves of the sweetheart neckline both front and back and the lower hem of the blouse as well as the skirt’s hem. The binding adds a little body to the blouse’s hem and I like that effect.

HPIM6906  Pre-folded Bias Tape made hemming easy. It allowed me to have more length on the skirt as I wasn’t folding up a hem.

  HPIM8067  HPIM8065

The front and back views of my version of Rose-Marie.

Sari Sailor Suit

Earlier this week I presented Veronica to you and mentioned Jenny. Jenny is now ready for you.

If you haven’t read my last post, I will explain who they are. Veronica and Jenny are two patterns produced by The Tailor’s Apprentice. Veronica is a 1940’s evening gown with a capelet and Jenny is a sailor suit, also from the 1940s. Lorna McKenzie is the designer and she has used actual clothing from the WWII years to draft these patterns. These were clothes owned by Miss Page. Lorna tells her story on her website. She also has 3 other 1940s patterns at the moment: a wedding dress, a day dress and an overall type thing! There will be more.

It took me a couple of days after downloading the digital patterns from Lorna to decide which fabric from my stash I would use for Jenny. It was a cinch choosing the fabric for Veronica!!! That’s why I started with that pattern. In the end, I chose to use another of my saris to make into the sailor suit. Once it was done, I was amused to observe that I had turned the formal gown Veronica into a day dress and the casual sailor suit into a dressier outfit, as you will see. Asi es la vida!!

By the way, digital patterns are as easy to use as store-bought ones. After receiving your file by e-mail, you print it out and re-assemble it, a bit like a puzzle, and then proceed with cutting the paper up and then cutting your fabric from it. When I say *like a puzzle* it actually is easier than that! All the pattern pieces are logically and clearly numbered, so all you need to do is place them in rows and columns.

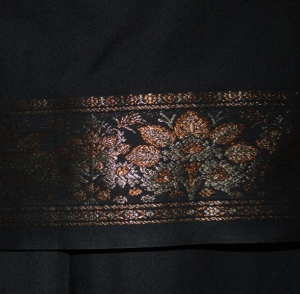
So, back to Jenny in a sari. I love using saris for many of my clothes: the fabric drapes so nicely! And the colours! and the metallic thread borders! Having said that, this sari is black with pewter and copper metallic thread borders.

The sailor suit consists of a short-sleeved top complete with little square scarf thing at the back that ties at the front and a pair of trousers. The very attractive design component of this suit is how the top is yoked at the front. It has a pretty swooping curve. The pants are straight.

I started with the top as it is more *involved*. I prefer to do the difficult thing first. Once again this pattern is in three sizes. I cut everything in the large size, for added comfort. There are two small darts on the blouse. The sleeves also have darts or pleats at the shoulder which give them a slight puff. The ’40s’ puff!!

The instructions are clear and precise and assembly went well. Here are the things I changed though, customizing it to my preferences. First: I lengthened the top. In the pattern picture, it is a short blouse which just covers the trouser top. As I am a *certain* age, I prefer my dressier tops to be tunic length: ending about 2/3 way up my thigh. This entailed widening the hemline by simply lengthening the sidelines a little and I chose to make a slit on either side for more comfort.

I also wanted my sleeves to be full length. But they can be rolled very flat for times I might want it shorter because I made them straight down.

Same as for Veronica, I omitted the side seam zipper. I just didn’t feel there was a need for it, for me, and besides, I don’t like the feel of a zipper on the side there. It stiffens the fabric when using a soft one like sari material. The last change I made was to keep the scarf thing apart from the blouse, rather than sewing it to the neck edge. The instructions guide you through using a bias tape (made from the same fabric and for which a pattern piece is supplied) to finish the neckline. I still used the bias tape. I added one thing: because I was using a sari with a beautiful border, I wanted some of that around the neckline. I had to place it correctly in line with the edges of the neckline and make it stop at the top of the border that was part of the yoke. See picture.


The pants are only four pieces. I widened the pants, to really take advantage of the border; in addition, I like wearing skirts in summer but I find them inconvenient at times. So lately I have been making pants wide at the bottom and which are fitted at the top and they look like skirts (or Palazzo pants) because I almost always use soft and flowing fabrics. Comfort and elegance all wrapped in one, if I do say so myself! 🙂

There is no waistband but an inside facing that helps keep things tidy and flat. They have a side zipper and because I liked the fitted look of these, I did use a zipper rather than my usual elastic waist. The well-written instructions guide you through that installation smoothly. There are two small darts on the trouser back pieces which make it lie completely flat to your rear end.

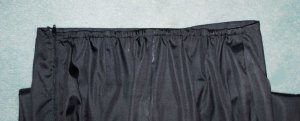
The last thing I did was make a narrow casing with the facings and the pants in the back. Here’s how: after attaching the facings to the pant top, I tacked down the facings at all the seams and then sewed across the back, from side seam to side seam, about 1/2 in. down from the top. Then I slid the elastic in there, sewing it down on either side seam. I cut my clothing slightly bigger than I actually need for comfort. Sometimes that makes the pants droop. So by putting that narrow little elastic in the back, it holds the trousers up snugly at your waist(or wherever) and makes the front look taught and smooth, without bunching the back at all. There is more space around the middle and bum for sitting in that way too. This *flatness* is also necessary when wearing a lightweight fabric top. The tunic shows no bunches or anything when you are wearing it. Of course in the picture it is slightly gathered: cut the elastic just long enough for it to stretch gently and it will then lie flat on you.


This pattern has extra long legs because Lorna offers the option (with instructions) of making cuffed pants as was stylish in the 1940s, even for women. Again, I wanted the sari border to be the decoration at the bottom, so I cut the pants to my usual length. Placing the pattern pieces correctly on your borders is crucial: I lined up the pattern grainline on the cross-grain(that is the weft of the fabric, as opposed to the grain which is on the warp. They cross at 90 degrees.) in order to get the border at the bottom.  Come to think of it, that’s what I did for the sleeves too: put the sleeve hem on the border and the cross-grain of the fabric became the grainline on the pattern.

As the end of assembly was nearing, I realized that this outfit would be a very appropriate evening ensemble, not very formal but *nice*. I also saw that it looked a lot like an Indian set, of course, because I used the sari and it’s embellished borders to the max! The last thing I made was a wrap with the last bits of the sari and I can use that on cooler nights.

So in the end, I made Veronica the evening gown into a day dress and Jenny the day outfit into an evening set. Twas ever thus! While discussing the changes I made with Lorna, she pointed out that the original pattern called for a tunic length top, but that *the hipsters thought it would be better shorter*, so she made a short top for this pattern. I simply returned the pattern to its original design!


Moving to the ’40s.

 Hello! I’m back! With the end of the 1912 Project came a temporary stop to my blogging. Not that I haven’t done anything since then!! I will write about some of those sewing projects later: *The Spirit of Hallowe’en* was one, complete with top hat and gown. There were a couple of wedding gowns… and I made a fall coat to match the Skants I posted about, as well as a three-piece set of dress, skirt and bolero made from a delightful insect print heavy cotton, amongst the more interesting projects… There were some textile-but-not-sewing projects done too. I made a few embroidered leather bags and other accessories as well as a few hats (including a top hat) for the Geek Market I had a booth in last October. Oh dear, I have just realized I have a lot to catch up on!

Through the 1912 Project I met many ladies from all over the world. Many own and run their own clothing/costuming, millinery, wig making or footwear businesses. One that caught my eye was Lorna McKenzie’s *The Tailor’s Apprentice*, out of Sydney, Australia. I followed her travels to England in late summer and wandered about her website. She recently posted asking for testers for her line of 1940s patterns derived from real clothing she received… She tells that story very well on her site: http://www.thetailorsapprentice.com/index.php/patterns/category/miss-page. As I enjoy period costumes and clothes, I volunteered by writing to her saying I would like to give it a whirl! Within that week I received two patterns in digital form, which I printed out very easily, really! I chose the sailor suit named *Jenny* and the evening gown called *Veronica*. There are several more: a wedding dress, a day dress and overalls.

The featured image and the two pictures below are The Tailor’s Apprentice’s pictures of the *Veronica* pattern.


Don’t be afraid of digital patterns: they are easy to use and anyway, Lorna gives very clear instructions on how to download, print  and reassemble them. The pages were clearly marked for re-assembly and the patterns are multi-sized too. Lorna includes well described and illustrated instructions to sew up her patterns: see the pictures below. I found them easy to follow and appreciated her personal notes on making it more *period accurate* if you want to.

So here are more thoughts and comments about Veronica, the evening gown with cape. I chose to sew that one up first because I have a lovely light-weight rayon that came to mind as soon as I saw the pattern on-line. It has a slightly vintage feel to it with its varying sizes of roses in red, yellow and royal blue with green leaves on a white background. I had chosen a similar recent style to use on it, but Lorna’s pattern just hit the mark in interesting details (like a sweetheart neckline and the way the princess line is formed) and of course, the vintage factor. Being a costumer, I always like the more unusual patterns if I am going to use any at all!! It will be perfect for evening wear to take on our little holiday in southern climes in January.

This pattern is for a *proper/formal* evening gown: it is to the ground and includes a separate short capelet. I don’t need a formal gown right now, I want a more casual dress, so I cut it to mid-calf, following the indications of where to shorten it printed on the pattern. The photographs below show the *shorten line* and then how I fold the sides to make cutting easier. I made the capelet though, as the gown is sleeveless and I tend to get cold in the evening, even in summer. This will dress it up perfectly and keep my upper arms protected from the breezes that crop up when the sun goes down.

I love using multi-size patterns, as they can be modified easily at the cutting stage. Shortening the skirt is done mid-way and I like that as I really like wide hems, especially in a flowing fabric like rayon. The heart-shaped neckline is beautiful: the small change I made there was to lengthen and narrow the straps so it would be a little lower and a little less boxy. (Horrors, such a floozy!! hahaha!!)

The unusual, or rather, vintage, detail in the bodice is that the front side pieces don’t go straight up to the armhole: they curve over to the side seam about 4 inches below it. I liked that look.

I made another change as well. The pattern calls for a side closure, which is the way most dresses were done in those years. It makes for a nice centre back piece, undisturbed by a zipper or buttons. If you want to keep the real vintage look, Lorna explains that snaps, hooks or a metal-toothed zipper are best. I prefer to have none, if I can manage getting the dress on without an opening anywhere! So I tried it on after the initial assembling of the dress and it worked. I normally put my dresses on from the top rather than walk into them and pull them up: so very often no zipper is needed to open it up enough to get into it.

The facings were easy to sew on… I always seem to have trouble with that part, but this pattern worked on the first try! 🙂

Once everything had been put together and properly ironed, I decided to top-stitch all the edges: neckline and armholes. It helps to keep the facings inside and gives it a more casual look.

The capelet is short and flowing, with a turn-over collar. I chose not to line it, but I will fringe it. I am planning to use a 12 in. deep satin fringe trim on it to help it stay on my shoulders better as well as a small clasp from my Treasure Box of vintage buttons and clasps. It may slip off too easily otherwise. I haven’t bought the fringe yet. There are not many colours to choose from at my usual shop: white, red, black, navy or yellow. I am leaning towards the red. I like the punch!

Here are a few pictures of my version of Veronica, in this order: front dress, back dress, front with cape, back with cape. I will post new ones once the fringe is on the capelet.


East meets west as they Wrap into one.

Here is another example of the interesting historical patterns which can be found at the VPLL website, offered as part of the VPLL’s 1912 Sewing Project. This is a 1912 fringed lady’s wrap with deep scallops, almost like bat wings! As soon as I came across it, I knew what fabric I wanted to use! I had a remnant from a sari I bought last fall. I made a circle skirt with the body of the sari and kept the pallu: that’s the especially ornate, decorative and patterned end of the sari which is usually thrown over the left shoulder.

I love saris. I was first introduced to them at about 8 years old, when my father befriended someone who worked with him at the CBC who was married to a lovely little Indian lady named Shakuntala. We often shared meals and eventually she gave my sister and me an old pure silk sari in shades of violet and black. It was printed with the perennial paisley design so dear to India. I still have it in my closet!

Anyway… my love affair with saris and most things Indian most assuredly started then.

As I digress nostalgically about saris, I mustn’t forget my present project.

The sari I bought last fall had bright colours: red, yellow and blue-green melding into each other and a Jacquard pattern woven into it which reminded my husband of fish scales. He thought it would be a good base for a Hallowe’en costume, as we had been invited to a party and I was still looking for a good costume to make. The blue-jade ran down the centre of the sari and as soon as he said that, I saw a siren’s tail… That will be the subject of another blog one day… So the sari was bought and quickly transformed into a skirt (see the second picture: that’s the circle skirt hanging to stretch before hemming it) which would become part of *Sedna*.


And there I go again! I was saying that I knew immediately upon seeing the pattern that I would use this remnant. The pallu is mostly red and yellow with dashes of blue-green and I was a little worried it wouldn’t be big enough to accommodate the wrap… but I was wrong. There was plenty! There was even enough to cut the tie linings but not enough to line the main body of the wrap.


I STILL have smaller bits which are folded away now that will undoubtedly be used as accents somewhere. They are packed away with several other saris awaiting their turn for use! And there I go again… It must be because I am in a very quiet house tonight: everyone is away at work or chumming with old friends. I can actually think, compose and write as well as savour my wine at the computer without guilt and without interruption!

The wrap pattern consists of only 3 pieces: two different length ties and the wrap itself. While I was placing the pattern on the fabric I was wondering what I would use as a fringe. I have several lengths of satin fringe, but most of them are black… I didn’t want that kind of contrast. The instructions also called for a lining. I did cut one out of bright red lining although I wasn’t certain I would want it. I thought it would be a convenient cover to hide the fringe band if I used a fringe.

I stay-stitched all around the wrap as it has scalloped edges and they tend to stretch even with *ordinary* fabric. But sari fabric is often rather loosely woven. This one is especially. So, to prevent too much distortion and stretching I stay-stitched.

My search amongst my treasures turned nothing up at first… So I went ahead and started sewing the ties to their linings. As I strolled over to my ironing board to press them I caught sight of a piece of beaded fringe a special friend gave me. I used to make belly dance and tribal costumes (for others as well as myself) and this is left over from those days! The fringe is gold, red and green. The gold was a perfect match for some of the yellow shading in the sari and the red and the green just worked too! There is a pattern within the fringe: red roses with a green leaf on either side. A 4” glass beaded fringe is a little heavy, but it doesn’t matter much to me. I figured it would help keep the wrap nicely pulled down to show the beautiful woven as well and dyed patterns in the fabric. Best of all: the fringe is beaded onto a yellow ribbon. I measured it and it was as if it had been cut especially for this project! Perfect fit!

So I carefully sewed the fringe on to the edge of the wrap with a zipper foot, still thinking I would line it. I actually did sew most of the lining to it as well, afterwards. But it felt wrong. I stopped sewing and took the lining off. I decided to use the yellow ribbon as the cache for the cut edge. I turned in the seam allowance under the ribbon and sewed the ribbon down over it. A very clean finish! After some consideration, I decided to sew a  narrow red satin ribbon on the right side of the wrap. It seemed to need it.

The ties could have a pleat or not. I chose to simply sew them flat to the wrap ends, as I intend to use them to tie around the waist at times… Easily done! I carefully top-stitched the ties on and there you are! The wrap was done swiftly. If it hadn’t been for the search for the fringe, it would have been done in an afternoon. This is an easy project for beginners and pros alike!

The best part of this is: I can use the wrap as a shawl, as it is intended to be, or as a hip scarf over the matching skirt! I don’t *dance* much anymore but I love my bright colours in summer and this certainly fits THAT bill! I will wear the skirt and wrap with a solid coloured t-shirt and it will look just dandy!


1912 Duster for Fall.

I chose to try this Duster from the VPLL 1912 Titanic Sewing Project as a fall coat because I had enough of just the right coloured medium weight fabric for that season. So although I lined it, I didn’t add extra warm lining, I used regular Kasha coat lining and no inner layer between the outer fabric and the lining. The lovely moss-green velveteen which I wanted to combine with a striped fabric in a greenish gold colour with dashes of rust and dark green would reflect autumn perfectly.


I used the Kasha lining for the body and sleeves and just for fun, I used an *eyelash* fabric for the collar and cuffs’ lining in a similar moss-green.

After printing it out and measuring the armhole size, I realized that I would have to enlarge it because I am fairly broad-shouldered and know from experience that the early 1900s jackets and coats which were meant to be tight are usually quite uncomfortably tight for me. I enlarged the armhole by cutting it lower about 1 ½” and tapering the new cutting line up to half-way up the armhole. Because of enlarging the armhole, I also added that same extra measurement to the sleeve pieces by extending the cutting line by ¾ ” on each sleeve piece. When cutting velvet and its derivatives (velveteen and corduroy), all pattern pieces must point in the same direction and I prefer to place them so the nap from the velvet runs UPWARDS: that makes the colour look darker.


Another change I made: I made a cuff pattern to its full size because I wanted to cut it on striped fabric and I wanted to make sure each cuff would be properly centred on a stripe.


The two collar pieces are sewn in the centre back for both outer fabric shell and the lining. I got this done before adding either trim or piping. The pattern calls for trim on the collar and cuffs… I opted for a lovely thick rust silk piping which exactly matched the rust in the contrast fabric for the collar and cuffs. I sewed this on both the outer collar edge and the upper cuff edge. When sewing piping on the outer edge of corners, one must remember to cut into the seam allowance of the piping to ease it around the corner and make a sharper corner.


The collar and turn-up cuffs are lined… which means that the lining fabric has to be sewn to the outside fabric of the coat and the proper collar fabric is sewn to the lining. I thought it would be easier to assemble that way. Similarly, the cuff lining was sewn to the outside sleeve fabric and the contrast fabric was sewn to the lining. After assembling the two sleeve pieces to make a sleeve in both the outer fabric and the lining, I sewed the sleeves into tubes at the underarm seam. It is important to align the cuffs’ seam to the side seam slightly which is slightly to the side of the centre seam and NOT to the centre sleeve seam, otherwise the buttoned notches would not be facing the right way.

These older patterns have a curve in the sleeve pieces that make it easy to see which arm is which! It also makes the sleeves more comfortable and less bulky. So now I have a lining sleeve with the cuff fabric sewn to it and an outer fabric sleeve with a lining cuff sewn to it. I sewed the two sleeve parts to each other at the edge of the cuffs. Clipped the inside corners for a nice square corner and pulled the lining back into the sleeve. My sleeves were ready… just one more thing to do to facilitate sewing them into the armhole: a quick basting stitch around the edge of the sleeve top where it is sewn to the coat. And I turned the cuffs up.

I came back to the duster body. I sewed the front and back at the shoulder seams and on the sides for each part: the outer shell and the lining. I then sewed the lining to the outer coat from the centre collar seam down the collar and then down the front of the coat and to the hem and returned to sew the second side the same way. I find it easier to sew the collar on that way, without the weight and bulk of the sleeves getting in the way. It was time to give everything a slight press with the iron. Again it’s easier dealing with this without the sleeves dangling and falling off the ironing board.

I made lined pockets… I even added them to the coat on the indicated lines on the paper pattern… but I took the pockets off as I disliked the extra bulk on the coat. I prefer inside (or slashed) pockets if I put pockets on a coat at all. And… I must admit that my choice of fabrics may have been perfect colourwise, but because it is velvet, this duster does look a bit like a dressing gown… the pockets emphasized that and so I removed them… :-(.


Now to attach the sleeves… Because I basted the sleeve edges I didn’t need to stay-stitch them. It was a simple task to align the sleeve centre seam to the side seam of the body and start pinning the set-in sleeve. I sewed the two layers from the sleeves to the outside shell of the coat. When both were done, I turned 3/8″ seam allowance down and pinned it all in place to hand stitch the lining neatly to the sleeve seam.

It took me two days to find the buttons I used. I have a dozen shoe boxes filled with thousands of buttons, most of them vintage! 3 of those boxes were just coat buttons. But… it took me the two days of rummaging through everything to make sure none had got mixed up in other boxes. (This happens over the year of work. Once a year I have to go through everything, putting the hastily thrown in buttons back in their proper homes. I have labeled the boxes by colour and size… ) I was hoping to find one set for all the buttons needed for this coat: 3 on each lapel, 2 on each cuff and 4 down the front. By the end of my first day of searching I had found three sets that would work well together as I never had enough of ONE kind to do all the buttons. Since I used a contrast fabric for the lapels and cuffs, I thought I might find 2 sets that would work, one for each fabric. But not. :-(. So the next day as I was making the final round of shoe box labeling, I discovered 2 boxes that had been pushed far back on the shelf! And within these boxes I found two sets that worked even better than the first I found the day before! There were in fact 7 matching buttons for the green body of the coat and 16 (!!! 16!!!) matching buttons that perfectly picked up the colours of the striped contrast fabric!!


So I measured the large green buttons for the front and decided to use 6 of them and keep a spare, and made 1 ¼” buttonholes. I used that many buttons to make sure the coat stays closed… I am permanently cold from October to end of May. The wind flapping my coat open makes me crazy!!!  In December I change coats and move to the heavy-duty clothing I also make… usually with zippers and a buttoned flap to cover the zipper. I sewed 3 buttons on each lapel and each cuff, leaving 4 spares. Once all that was done, I hemmed the coat and the lining separately and took pictures. I intend to make the *Mature Lady’s Hat* in the same moss-green to match the coat. But first I have to write and post this blog!!


The Mad Hatter is IN!

A new challenge was sent out mid-February for the March Challenge from the VPLL’s sewing project. Our leader Kim sent this to us:

“This is a CHALLENGE! Not a pattern challenge, but a challenge to those of you who want to play 1912. Because in 1912 all of the La Mode would be getting ready to buy and all of the others would be starting to plan…. their Easter bonnets. Yep, everyone needs a new hat for Easter whether you celebrate it or not. So on Easter, let’s have a parade! Pix of all the new duds, along with your new Easter Bonnet! It can be as elaborate as a silk and buckram model or grabbing a straw hat and decorating it with ribbons and flowers.”

Not one to ignore direct challenges and dares, I took it up. How could I resist? Since I discovered the ad for this 1912 Project my every spare moment has been consumed by looking for pictures myself or looking at the pictures the other ladies find and post. Then making some of these items… As I mentioned before, I realized that I could not possibly ever see all there is to see nor save it to my computer. But I have kept most pictures for one *subject* every time I see one: HATS!! Oh my God the hats I have seen!! Feathery, floral, feathery and floral together, ribbon decorations, bows, more flowers, more feathers, fruit and small birds and the list goes on. HUGE hats, teeny tiny ones. Lace concoctions simply plopped on the wearer’s head. Enormous hats balanced on bunned up hair and wind-defying in their stature… In the pictures below are actual photographs of ladies wearing these hats, some to outside events.


     It is amusing to note that the flowers in her decolletage are exactly the same as the two bunches on her hat!

When I shot down to my studio to get the materials together for my new Easter Hat I pulled out fabric and lining and a number of flowers and ribbons, lace and other trims. There was no plan yet.


I just knew I wanted the hat to be pale pink, white and grey. I had some white ostrich feathers left over from the Plumed Hat: they would provide the white froth. I spent one day going through my antique and vintage lace box and pulled out many matching bits. Had to iron them all. It took a couple of days to find the right base for the hat. The local Salvation Army had the perfect hat on a mannequin but wouldn’t sell it to me until the end of the month. I had to wait about two weeks. And the trepidation which kept me awake: will I get there before anyone else takes it? was making me crazy!! (yes… I suffer from a certain amount of obsessive worrying at times!!) So I took all the trims and things and started the sorting: colour matching the various pink items and eliminating the wrong pinks. Upon seeing the varying widths of the ribbon, one was chosen to be the spiraling for around the outer edge of the brim.


I wanted grey as well and all I had was a tiny bit of ribbon. That’s when I decided to order natural grey ostrich feathers.

Blanket ribbon in the bottom left corner. Ostrich feathers in 3 shades.

They arrived within the two weeks of waiting for the hat! I was delighted with the colour of the grey to brown feathers when they arrived. Two or three were exactly right for this project!

One day, as I was driving home from visiting my Mum, I realized I was going by the Sally Ann and had missed the end-of-month date to go get the hat! Argh!! That Voice of Doom in my head was saying things like: *It’s gone, since it went for sale four days ago… EVERYBODY is looking for an Easter hat don’t you know and isn’t that one just perfect?? It won’t be there… Should I stop or should I go on? Oh well, I am here anyway!! * This store has been reconfigured in the past year and I couldn’t see the hat anywhere… Voice in my head: *Oh, well, I shall browse, maybe there is something else equally suitable.* I turned at the end of the fourth aisle I had gone down and THERE on the wall facing me was MY hat!!  Immediate dance of joy and quick shuffle to the wall, grabbed the hat (It was brand new!!!) and sang all the way home. I think Metallica was singing Neverland and I cranked it!

And so it began in earnest… I got a lot done that very day. I cut out a light weight lace from its large flat piece of fabric (picture below left) into the correct scalloped shape I wanted and then sewed it to the underside of the brim, as was pictured in one Hatlady’s website (picture below right).


Then I put the blanket ribbon around the crown. It was the perfect pink and too short to ever apply to a blanket anyway. I had plans for using some white gathered satin ribbon but in the end found it too busy. When that was finally done I pinned more lace on the top side of the brim in place, you know, pinning it here, adding more, repinning the first bit, taking it all apart and starting over again… Went back and forth like that for another day. Once I was satisfied with the brim I started working the feathers.

And the very next day I got an immense job request from the Museum. Noooooo!! But of course, I can’t turn down a job that helps pay for my hat bits and home insurance… Maybe that order is somewhat skewed but that’s how I feel about priorities at times! 🙂

All I could think about was getting back to the hat! Last week I had to finish the museum’s oder and I was sewing a beautiful gold satin and grey lace (with extremely tiny sequins) two-piece outfit. I also had to finish embroidering the Ultrasuede for my Steampunk bustier for the event I was planning to attend on Saturday night as well as complete the gear and cog earrings to go with the outfit. So the hat was finished in the late afternoons of Thursday and Friday.

 Back view, before the pink ribbon spiralled edging was sewn on.

Sunlight through the brim shows both lace types sewn to the top and the underside.

Sunday I read everyone’s news on Facebook and generally did nothing except go for groceries… and be very pleased with my effort at the Easter Hat. My very good (hat adoring and shoe fetishist) friend came by and was suitably admiring and we decided that now we need to order black ostrich feathers for our next hats. They were bid on and won by Sunday night. All we have to do now is sit… and wait…

Passion for the Fashion!


Life has been rather hectic since my last post. Lots going on at home and everywhere else!

I received our Titanic Sewing Group’s first pattern last week on Thursday. 1912 Afternoon Wrap, pattern # 0291, from La Mode Illustree, found on the VPLL’s website. First thing I did was go to my private stash and rummage through that until I fell upon a remnant from a  skirt/pant I made 3 or 4 summers ago from a lovely royal blue Jacquard light weight satin which goes to navy on both selvedges and within that darker part is a gold woven pattern of butterflies and scrolling. So the wrong side of this is just as beautiful as the right side… This explains why I chose to make the Afternoon Wrap without a lining. The flashes of gold add an interesting dimension to the outfit!

The fabric

Same as for the Challenge Pattern (the Princess Slip from my previous blog), I printed the pattern from a .PDF and reassembling it was easy. We were provided with a cutting layout and I saw that it showed cutting the two main and the four collar pieces separately on a single layer of fabric and realized that they had been placed incorrectly. Another Lady in our group brought that up yesterday… before I had a chance to report on it. I passed over that as I intended to cut these pieces on a folded piece of fabric, that way only cutting one large main piece and two collar pieces. As long as either the two right or two wrong sides are touching, the pieces get cut correctly, that is: mirror-image of each other and you are ready to assemble them.

I stay-stitched all the pieces. It means a lot of work removing some of that later, but prevents the pieces from changing size as many of the edges are on the bias or other than straight grain of the fabric.

There were two darts indicated on the main piece. One for the shoulder and one for the bust. After measuring the distance from the shoulder dart to that bust-line dart, I decided to lower that dart a little and extend it too. It was too high to lie where it should when I am wearing my *regular* bra. It would have been fine if I wore a push-up bra… These things always come into play, right? They do make a difference on some of us hahaha!! 🙂

Another change I made was to lengthen the back and front parts because again, after measuring, I saw that the hem line would lie across my widest part, and I don’t particularly want to put a spotlight on it… (I must confess that lately, I prefer to wear slightly longer t-shirts, vests, sweaters and jackets for that reason too.) As I was cutting the pieces out I was thinking of the trims and other decorations I wanted to use. The pattern called for making a belt and adding tassels to the sleeve points. As I didn’t have any ready-made tassels but did have a bit of matching dark blue satin fringing, I chose to make the tassels with that and embellish the tassels with beads. I have been beading for years as well and to put it mildly, I have beads in many colours, textures and sizes and shapes. (Being a sewer for the last 40 years, and a collector of *bits*, I have a large selection of many things to use when I don’t have exactly what is required.) Depending on how much fabric border would be left over, it would be used to make the belt. If too short, I would make a buckled belt as suggested but I was hoping it would be long enough to make a tied belt that would have long hanging ties.


 Tassels sewn to the point by rolling the hems over the crown of the tassel.

I wanted to spotlight that lovely border as much as possible, so turned the pattern piece 90 degrees making the centre back sit along the selvedge and the butterflies would be going up and down my back, rather than across it and the front pieces. The instructions included adding an optional band on the sleeve edge. Rather than add another layer of fabric to the sleeve edge, I decided to turn up the hem using the gold wrong side outside at the hem which added only a narrow detail instead of the wide one suggested.

  You can see the wrong-side-turned-out hem and the point which is covered with the selvedge border.

As I looked at the sleeve, it occurred to me that if it was going to have a nice gold edge, it should also have more decorative points. After cutting enough border for the belt, I found that I still had enough border length to cut four points from it and add them to the points of the sleeves. It gave the points the same fade from dark blue to the royal blue as the hem had and would decorate the points a little more than having just the tassels hang from them. This was also good for adding some weight to the points because the fabric was so light. Clean finishing the top of the triangle and sewing it to the end point was a quick job. When I turned the hem there, the two layers here turned over together to make a stiff heavier point which would be stronger to support the beaded tassels.

 On the left you can see the one point still pinned in and the second point has been sewn across its top to clean finish the new triangle.

  This is what it looked like before turning the hem.

Here are two of the sleeve points finished but before having added the tassels.

I made the pleats and sewed the darts first making sure everything was lying in the right spot with each piece. Then assembled the two main body pieces by sewing the centre back seam, as per instructions. The collar was equally easy to assemble and add to the wrap. Pictured at left below is the front pleat on right half bodice at waist line. The next picture shows the pleat on back bodice.


Using the border for the belt made a rather ornate belt. That was another reason for not using the order butterflies on the collar lapels.  I simply turned the two edges of the belt length under using the rolled-hem foot on my machine. Below is the wrong side of the belt piece.


I wanted to see the wrong side of the fabric too, in order to use the gold flashes that would appear as I moved. I didn’t want to use a buckle: that’s when I decided to make two more tassels for the belt ends. I shaped the square ends of the belt into triangles and sewed the tassels to the points of the belt, reflecting the sleeve points. The belt was then sewed to the middle back seam at its middle and everything was pressed once more. After beading the tassels, I made a beaded fringe with the blue beads which I then sewed to the front and back hems of the wrap. This all made it a little more formal than may have been used for an *Afternoon* wrap in 1912 but I may only use the wrap with the skirt on cooler evenings in the summer. I don’t wear that pant/skirt in winter! The very next two pictures show you the beaded fringe on front and back. The bottom pictures are front and back views of the entire outfit with the long-ago made skirt.


Now that it is done, I feel the slashed points of the sleeves near the bodice front need re-enforcing. So I will be adding a self bias strip stretching 3 in on either side of the opening.

And… I am pretty sure I will make this wrap in the same fabric used for the Princess Slip made to be a nightgown two weeks ago. Again, I will lengthen the front and back pieces and I will use the same lace as the gown for the sleeve edges. Instead of a belt, I will use buttons. It will be lighter than a bathrobe and give the nighty some extra *modesty* when not in bed, heheh!!

I haven’t been here in almost two weeks! I caught a bad cold, got better then caught a wicked flu that really floored me.  Actually, it bedded me, but that doesn’t really mean the same thing, does it? Fever, complete exhaustion and disinterest in anything have finally given way to getting bored with doing nothing . If I’m feeling bored, that means I’m better so I set to work!

Late last Monday night, Janyce (from the VPLL 1912 Titanic Sewing Project) asked the Ladies: *Who would like to try the Challenge project?*. It was a Princess Slip. As soon as that email got in my box, I wrote back to her volunteering for it. I actually received the pattern, via e-mail in a .PDF format, the next morning and was very excited and pleased so decided to print it out right away. That exhausted me so I went back to bed… after a half hour I decided to re-assemble the 30 pages of print-out into the large sheet containing the 4 pattern pieces: a middle front to be cut on the fold; a side front panel, a middle back and a side back all to be cut twice. It was easy: I figured out that the print-out was 5 across and 6 rows down. The pattern appeared as promised and I set to cutting it out. Then I went back to bed for several days. There is no pattern piece for the pleated flounce at the bottom of the slip as that is just one long, narrow piece of fabric. It requires a lace insert as well, to be done before the pleating.

Over the next few days, I read the excitement on our Facebook group page as the other ladies who volunteered for this *Challenge* project slowly received their own copies and got to work on their slips. I was discouraged as the weekend rolled around and I still hadn’t done anything. Simply too tired to think… but Saturday, I got up and went to search for the fabric and lace I wanted to use for the slip. An hour later I emerged from my workroom, sweating from fever but excited at what I had chosen. My first choice was to take out some white lining and ivory lace. Since I wasn’t ready to sew yet, I left it on the table to mull it over some more.

This past Monday I had to finish another project I wanted out of the way and looked at the fabric for the slip again. I was not happy with that choice anymore. So I went back to my stash of favourite fabrics and pulled it down since it needed straightening out again anyway and chose new fabric. I kept the lace I had first seen.

 Here is the vintage lace showing it’s 3 patterns.

The fabric I used is a crinkled, black flocked black chiffon. The lace is ivory. The narrow ribbon around the neckline is scarlet.

I mentioned that I read most of the posts the other ladies were writing. Many seemed to be having problems with this pattern. Sizing was a universal concern. So I measured the pattern, measured myself and was quite happy to find out that it wouldn’t need any altering, as the measurements of the paper pattern seemed to fit mine exactly! I made two small changes. I narrowed the back between the shoulder blades by about 2 inches and lengthened the straps by about one inch, while cutting the fabric. In the end, I would say that this is an easy to intermediate skill level pattern.

The lace I chose is vintage and 1 3/4″ wide. It is woven in 3 patterns across its width. The pattern required some lace 1″ to be used on the body of the slip and some lace 2″ wide for the neckline and the sleeve openings. I ended up sewing my lace into two 3″ wide segments, to use down the middle front and middle back of the slip. I cut one section off more lace to use down the side seams of both the front and back parts of the pattern. I further cut down the lace to use as a narrow band on the front bodice, to balance out the wider length which I used as the bottom lace insert.

Because this slip will actually be a nightgown for me, I didn’t cut out the fabric from behind the middle lace segments: it was very see-through and very wide… and as one of the Ladies wrote earlier, *I was giving away the ranch*. (What a picturesque expression!!! I like it!!!) I only removed the fabric from the side seam inserts on back and front, and behind the lace that crosses the bodice top.


Inserting the lace is a long job but not too difficult. It consists of sewing the lace along the marked spots, turning the piece over, cutting down the middle of the fabric which is now behind the lace, ironing the two flaps to either side of the lace, then sewing down these rolled edges to finish the seam nicely. This process emphasizes the lace if it is the same or a close colour to the fabric it is sewn on. In my case, the lace shows up very well either with or without its fabric backing.

Assembling the front to the back was easy once the lace was inserted. The pattern also called for several buttons to be put down the centre back. Since this is a nighty, I only put one button at the top as I don’t want to be lying on buttons half the night.

The next step is to cut the fabric in one long (about 4 metres) rectangle for the flounce. That was done by ripping it to my chosen width of about 12 inches. I thought to make my flounce out of a black chiffon embroidered in black. I felt it would be softer than the main fabric and would flow better at the bottom. I proceeded with inserting a plainer lace and then to pleat it. The pleats are accordion pleats, with one inch overlapping a two-inch section. This would make the pleats sit without heavy overlapping. It was suggested we read a chapter of this book: “The Art of Manipulating Fabric” by Colette Wolff to learn how to make these pleats. I adapted what I read there to my own needs.

You can see the two lines I marked on the envelope.   Here you can see the two lines I marked for the pleats.
Pressing the fabric over the edge of the envelope at one inch mark.

I took a thick envelope and marked a line one inch from the edge, then made a second mark two inches from the edge. That way the fabric could be folded over the edge of the envelope at the one inch mark and pressed. Then I would align the 2″ line to the (just made) pleat’s edge, weigh it down and bring the fabric over the envelope again and fold it back at the one inch mark. This way the pleats were being kept nice and flat under the paper and not getting ruined or in the way of  making the new pleat. Every 10 or 11 pleats I would press the fabric directly and pin one edge of the fabric to hold the pleats down until all of it had been pleated. Then I basted across the top of the flounce in order to make the pinning of the flounce to the hem of the dress easier.

  This picture shows the pinning of the pleats on one edge.

After the flounce was basted on, I overlayed another piece of the lace and sewed it in three places. This allowed to keep the pleats well flattened and when I wash the garment they will fall back into place much better.

The last thing to add was the red ribbon, woven into the lace at the neckline. I chose the scarlet because it just felt right to me.

 The neckline is emphasized by the scarlet ribbon.

 Front of the finished Princess Slip.

  Back of the finished Slip.


A Princess Slip from 1912.

Moving on while waiting…

Hello! 🙂  I was doing some *research* last night… browsing and surfing, clicking and saving. Floating from link to link that has been posted by The Titanic Ladies. They actually are made of two separate groups: The Unsinkables and The Titanic 1912 Sewing Project ladies. These are groups of ladies involved in the VPLL’s 192 pattern testing project. I discovered Pinterest in the past two weeks… which has led me to open an account for myself and all of you. You can re-pin my discoveries, the way I repinned many pictures in the past two weeks. I will try to post as many of my collection over the next few days as I can. It’s a long process because you can only pin one picture from your own folder at a time. No downloading the entire folder at once… very time-consuming. BUT, I think that for us it is a very good idea: that way we can share our discoveries. If you remember, if you read my first post, I am a very visual learner. I have been combing the Internet for pictures. They are educating me. I am learning about the 1910s fashions in a very in-depth way.  This Pinterest board of mine has changed names all week. I need to learn a little more about how to pin to the different boards… In the meantime, everything I am finding is going to the same board with its new name since yesterday: *Everything for now…*. I will try to sort things out later… Over the next week I will be fairly busy with a large bin of repairs to costumes and clothing from the Museum of Civilization.

One lady refers to our occupation as *sewist*. I like that! Its better than *sewer* (I explained my dislike for that word in my first chapter). Another uses: *fashionista sewista*. Fancy… but because I have been using the old word for so long, I may have difficulty using the new ones…

I finished the transformation of a Bomber Jacket to a Long Tibetan Coat this week. A good friend had purchased a thickly quilted, bat-wing sleeved bomber jacket in the early 80s and wasn’t wearing it anymore. But she really loved the jewel tones in it and was wondering how to go about making a more modern and practical garment out of it. So I took it on and together we made a neat long jacket by adding some fabrics she had in her collection.


I also progressed quite a bit on my Steampunk Outfit. I added some elements but the main push was to sew everything that had been pinned on, so I won’t get jabbed as much as I keep on working on it and to prevent thread pulls too, when I move the jacket from the dress, or try the bustle on for size. Another very important step I took this week, before the hours of hand-sewing I knew were to follow: I tried the dress and jacket on to make sure they still fit since I had made so many changes to the basic dress… It did. I heaved a deep sigh of relief!! Now everything is back on Dolly and her nameless friend and the details are being thought of and added or removed again… The sleeves are being decorated and sewn before assembling them to the coat, that way there is much less fabric to push around while sewing the lace or cording. Once the sleeves are complete, and the coat is finished itself, they will be joined at the armhole of course and it will be done.

I made a separate bustle from a raspberry pink thick velvet. In order to keep it stiff yet look soft and drapy, I ironed some very stiff interfacing to the taffeta lining and then sewed some old horsehair to the outside seams as I joined the velvet and the lining. The velvet looks soft, yet it won’t make unwanted pleats and the ones that are there will stay that way. The edges are being finished with a 4″ wide black lace for the bottom part of the bustle and the top one will have a matching but only 1″ wide lace.

  This is a close up of the thick scalloped lace being used all around the jacket panels and forming a bodice medallion of sorts. I thought to let the various pieces of the jacket hang loose from the hip down into panels that will ride over the bustle. That idea came from a picture of an 1871 Jacket.

(I want to add here that I realize now that I should have been more careful about recording the source of many of my pictures. I will endeavour to identify my sources better from now on… Unfortunately, there are already so many in my collection that it would be a complicated job to go back to find all the sources.)

As it is Saturday, I am thinking of taking a small break from my *research* for the 1912 project, my Steampunk Outfit and  the Museum work and go start playing with one of my Christmas presents. I received a starter kit of a product that allows me to sculpt with fabric, after a fashion… This product hardens and weatherproofs any fabric used for the sculpting. It can be used transparent, so the print shows, or dyed. One can make all sorts of figurines: human or animal and *things* to decorate the garden or deck or pond or the inside of your house. First a wire frame, slightly built out must be prepared and then the fabric is soaked in the product and then stretched onto the frame. I have an idea and it is time to try it out!

I bid you a farewell and wish you a good weekend! According to a post from our coordinator yesterday, my first package with patterns in it may arrive next week. … All I have to do… is sit… and wait… 😉