
I haven’t been here in almost two weeks! I caught a bad cold, got better then caught a wicked flu that really floored me. Actually, it bedded me, but that doesn’t really mean the same thing, does it? Fever, complete exhaustion and disinterest in anything have finally given way to getting bored with doing nothing . If I’m feeling bored, that means I’m better so I set to work!
Late last Monday night, Janyce (from the VPLL 1912 Titanic Sewing Project) asked the Ladies: *Who would like to try the Challenge project?*. It was a Princess Slip. As soon as that email got in my box, I wrote back to her volunteering for it. I actually received the pattern, via e-mail in a .PDF format, the next morning and was very excited and pleased so decided to print it out right away. That exhausted me so I went back to bed… after a half hour I decided to re-assemble the 30 pages of print-out into the large sheet containing the 4 pattern pieces: a middle front to be cut on the fold; a side front panel, a middle back and a side back all to be cut twice. It was easy: I figured out that the print-out was 5 across and 6 rows down. The pattern appeared as promised and I set to cutting it out. Then I went back to bed for several days. There is no pattern piece for the pleated flounce at the bottom of the slip as that is just one long, narrow piece of fabric. It requires a lace insert as well, to be done before the pleating.
Over the next few days, I read the excitement on our Facebook group page as the other ladies who volunteered for this *Challenge* project slowly received their own copies and got to work on their slips. I was discouraged as the weekend rolled around and I still hadn’t done anything. Simply too tired to think… but Saturday, I got up and went to search for the fabric and lace I wanted to use for the slip. An hour later I emerged from my workroom, sweating from fever but excited at what I had chosen. My first choice was to take out some white lining and ivory lace. Since I wasn’t ready to sew yet, I left it on the table to mull it over some more.
This past Monday I had to finish another project I wanted out of the way and looked at the fabric for the slip again. I was not happy with that choice anymore. So I went back to my stash of favourite fabrics and pulled it down since it needed straightening out again anyway and chose new fabric. I kept the lace I had first seen.
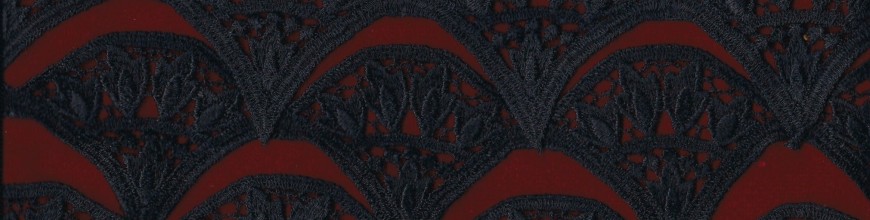
 Here is the vintage lace showing it’s 3 patterns.
The fabric I used is a crinkled, black flocked black chiffon. The lace is ivory. The narrow ribbon around the neckline is scarlet.

I mentioned that I read most of the posts the other ladies were writing. Many seemed to be having problems with this pattern. Sizing was a universal concern. So I measured the pattern, measured myself and was quite happy to find out that it wouldn’t need any altering, as the measurements of the paper pattern seemed to fit mine exactly! I made two small changes. I narrowed the back between the shoulder blades by about 2 inches and lengthened the straps by about one inch, while cutting the fabric. In the end, I would say that this is an easy to intermediate skill level pattern.
The lace I chose is vintage and 1 3/4″ wide. It is woven in 3 patterns across its width. The pattern required some lace 1″ to be used on the body of the slip and some lace 2″ wide for the neckline and the sleeve openings. I ended up sewing my lace into two 3″ wide segments, to use down the middle front and middle back of the slip. I cut one section off more lace to use down the side seams of both the front and back parts of the pattern. I further cut down the lace to use as a narrow band on the front bodice, to balance out the wider length which I used as the bottom lace insert.
Because this slip will actually be a nightgown for me, I didn’t cut out the fabric from behind the middle lace segments: it was very see-through and very wide… and as one of the Ladies wrote earlier, *I was giving away the ranch*. (What a picturesque expression!!! I like it!!!) I only removed the fabric from the side seam inserts on back and front, and behind the lace that crosses the bodice top.


Inserting the lace is a long job but not too difficult. It consists of sewing the lace along the marked spots, turning the piece over, cutting down the middle of the fabric which is now behind the lace, ironing the two flaps to either side of the lace, then sewing down these rolled edges to finish the seam nicely. This process emphasizes the lace if it is the same or a close colour to the fabric it is sewn on. In my case, the lace shows up very well either with or without its fabric backing.

Assembling the front to the back was easy once the lace was inserted. The pattern also called for several buttons to be put down the centre back. Since this is a nighty, I only put one button at the top as I don’t want to be lying on buttons half the night.
The next step is to cut the fabric in one long (about 4 metres) rectangle for the flounce. That was done by ripping it to my chosen width of about 12 inches. I thought to make my flounce out of a black chiffon embroidered in black. I felt it would be softer than the main fabric and would flow better at the bottom. I proceeded with inserting a plainer lace and then to pleat it. The pleats are accordion pleats, with one inch overlapping a two-inch section. This would make the pleats sit without heavy overlapping. It was suggested we read a chapter of this book: “The Art of Manipulating Fabric” by Colette Wolff to learn how to make these pleats. I adapted what I read there to my own needs.
 Here you can see the two lines I marked for the pleats.
 Pressing the fabric over the edge of the envelope at one inch mark.
I took a thick envelope and marked a line one inch from the edge, then made a second mark two inches from the edge. That way the fabric could be folded over the edge of the envelope at the one inch mark and pressed. Then I would align the 2″ line to the (just made) pleat’s edge, weigh it down and bring the fabric over the envelope again and fold it back at the one inch mark. This way the pleats were being kept nice and flat under the paper and not getting ruined or in the way of making the new pleat. Every 10 or 11 pleats I would press the fabric directly and pin one edge of the fabric to hold the pleats down until all of it had been pleated. Then I basted across the top of the flounce in order to make the pinning of the flounce to the hem of the dress easier.
 This picture shows the pinning of the pleats on one edge.
After the flounce was basted on, I overlayed another piece of the lace and sewed it in three places. This allowed to keep the pleats well flattened and when I wash the garment they will fall back into place much better.

The last thing to add was the red ribbon, woven into the lace at the neckline. I chose the scarlet because it just felt right to me.
 The neckline is emphasized by the scarlet ribbon.
 Front of the finished Princess Slip.
 Back of the finished Slip.
